Wolfram Function Repository
Instant-use add-on functions for the Wolfram Language
Function Repository Resource:
Generate the hexagonal tiling pattern of the hat and its supertiles
ResourceFunction["HatHexagonalTiling"][init] plots the hat tiling initial conditions for integer init from 1 to 10. | |
ResourceFunction["HatHexagonalTiling"][init,size] plots the hat tiling with init as initial conditions for a hexagonal array of integer size layers. | |
ResourceFunction["HatHexagonalTiling"][init,size,"type"] plots the combinatorial tiling of the given type. | |
ResourceFunction["HatHexagonalTiling"][init,size,typelist] plots the combinatorial tilings of all types in the typelist. |
| "Hexagon" | combinatorial hexagons |
| "Hat" | the Hat tiles |
| "Cluster" | 1-level supertiles of the Hat |
| "SuperCluster" | 2-level supertiles of the Hat |
| "n-Supertile" | n-level supertiles of the Hat |
| ColorFunction | Automatic | function with inputs from 1 to 10, gives colors as output. |
| ColorRules | Automatic | list of rules from integers (from 1 to 10) to colors. |
| "Count" | 1 | required number of possible tilings. |
Plot a single hat tile:
| In[1]:= |
| Out[1]= | 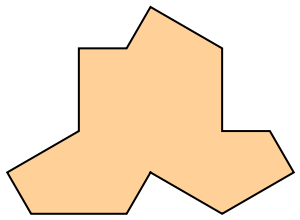 |
Plot a hexagonal tiling of three layers of the Hat tiles:
| In[2]:= |
| Out[2]= |  |
Plot with combinatorial hexagon, the Hat, its supertile (cluster), 2-supertile and so on:
| In[3]:= |
| Out[3]= | 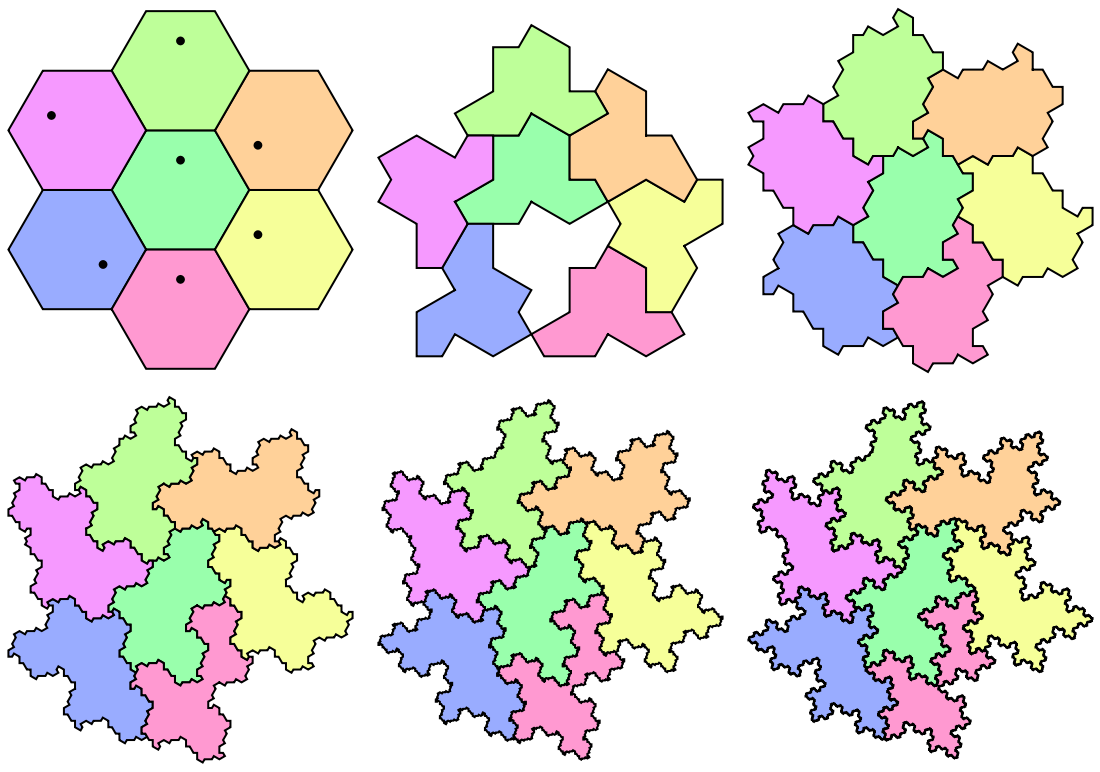 |
Generate three different combinatorial equivalent tilings with two types of tiles:
| In[4]:= | ![Grid[Insert[
ResourceFunction["HatHexagonalTiling"][6, 1, {"Hat", "1-Supertile"},
"Count" -> 3],
ConstantArray[Style["\[DoubleUpDownArrow]", 40, Gray], 3], 2], Spacings -> {1, 1}, Frame -> {All, True}, FrameStyle -> Lighter@Red]](https://www.wolframcloud.com/obj/resourcesystem/images/0b0/0b081130-492a-4834-bef8-2742fc4fba2f/07e7396830536f76.png) |
| Out[4]= | 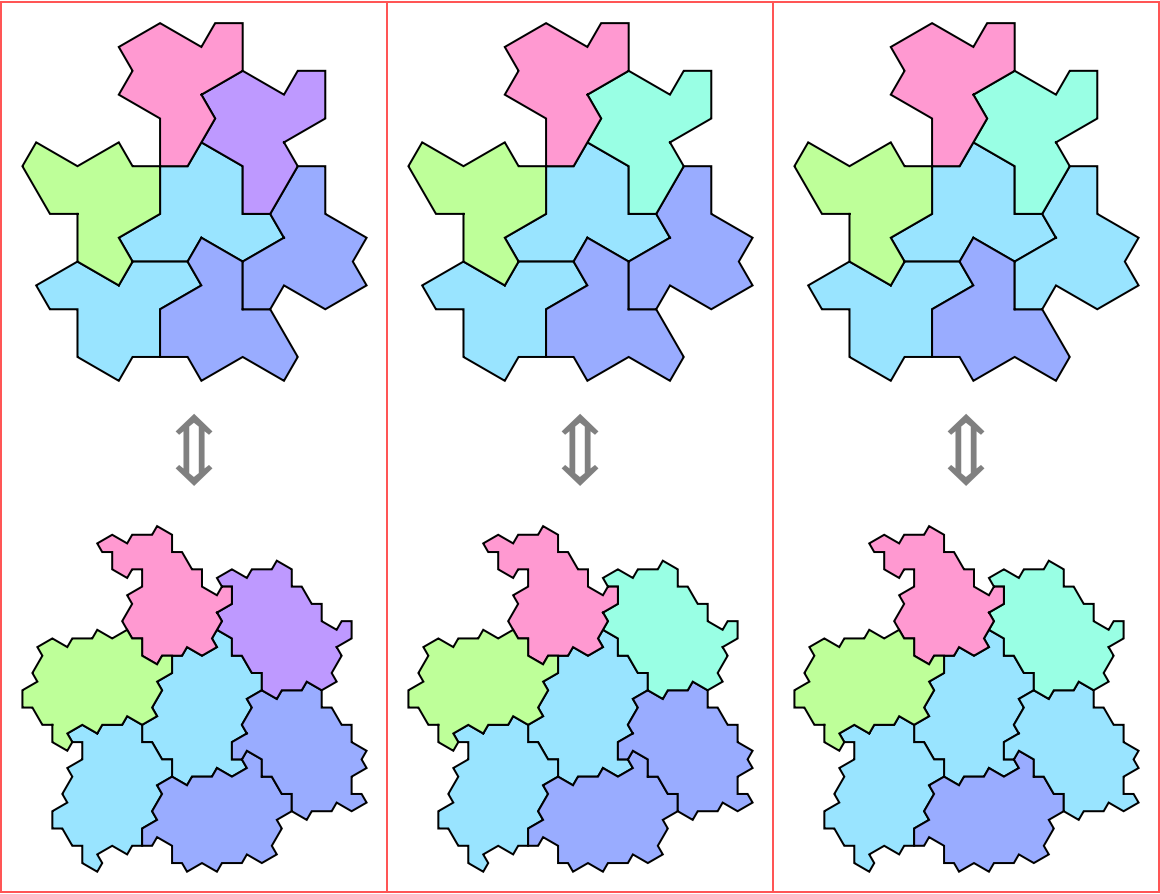 |
There are 10 different initial conditions:
| In[5]:= |
| Out[5]= | 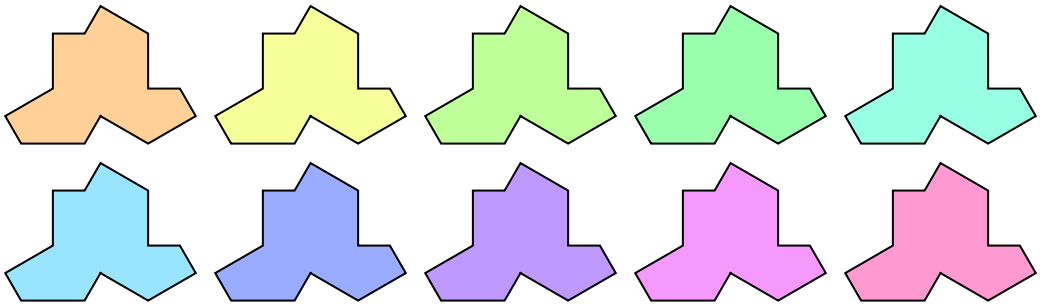 |
Compare with its supertiles:
| In[6]:= | ![Grid[Partition[
Flatten@Outer[
ResourceFunction["HatHexagonalTiling"][#2, #1, ImageSize -> 100] &, {"Cluster", "SuperCluster"}, Range[10]], 5]
, Dividers -> {{1 -> True, -1 -> True}, {1 -> True, 3 -> True, -1 -> True}}, FrameStyle -> LightGray]](https://www.wolframcloud.com/obj/resourcesystem/images/0b0/0b081130-492a-4834-bef8-2742fc4fba2f/68097d72639a2de4.png) |
| Out[6]= | 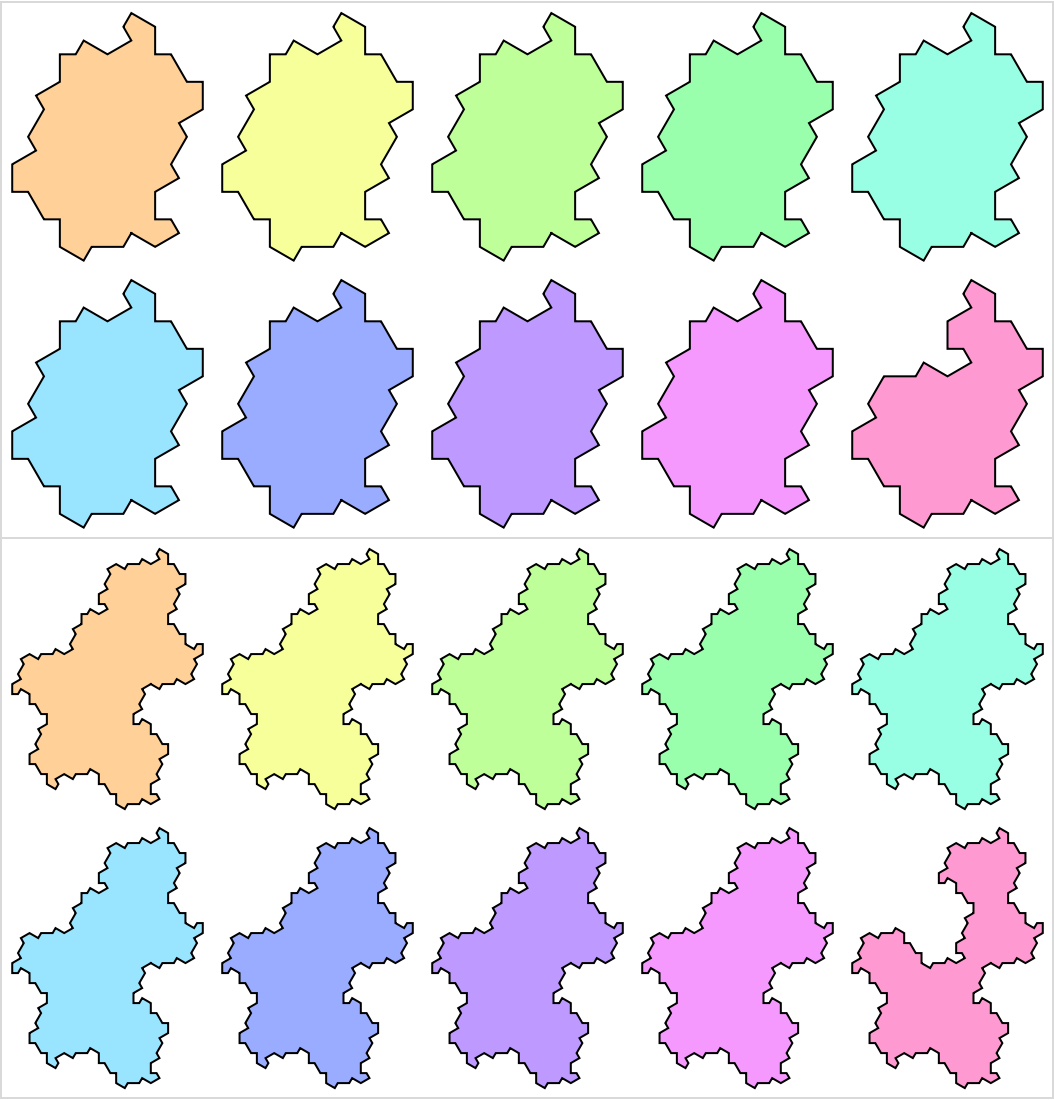 |
You can generate any higher level supertiles as you want:
| In[7]:= | ![Grid[Partition[
Flatten@Outer[
ResourceFunction["HatHexagonalTiling"][#2, #1, ImageSize -> 100] &, {"3-Supertile", "4-Supertile"}, {7, 10}], 2]
, Dividers -> {{1 -> True, -1 -> True}, {1 -> True, 2 -> True, -1 -> True}}, FrameStyle -> LightGray]](https://www.wolframcloud.com/obj/resourcesystem/images/0b0/0b081130-492a-4834-bef8-2742fc4fba2f/2b6e1daaadd1bfc2.png) |
| Out[7]= | 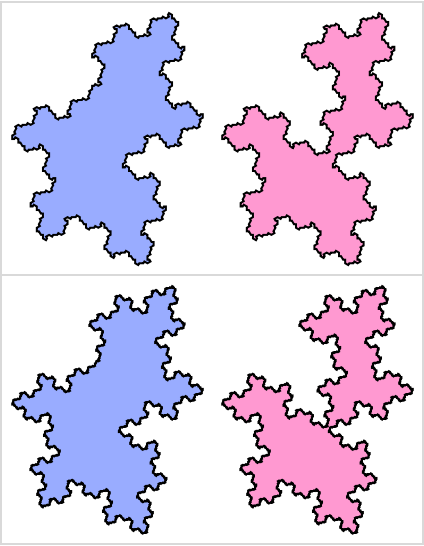 |
Color the tiling using GrayLevel:
| In[9]:= |
| Out[9]= | 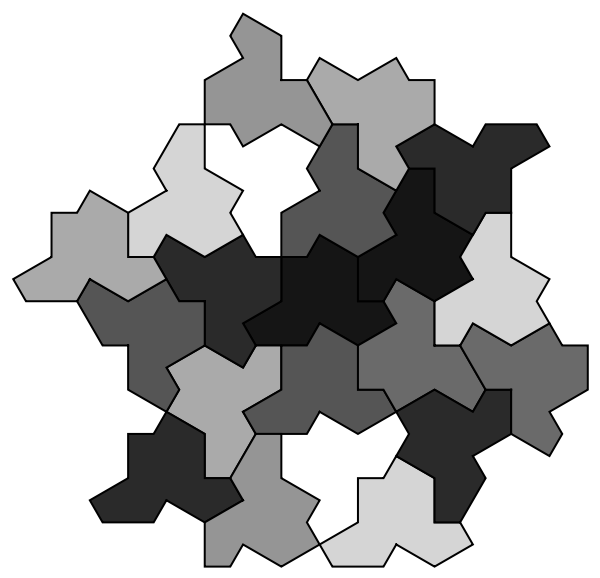 |
Add red EdgeForm in a blue tiling:
| In[10]:= |
| Out[10]= | 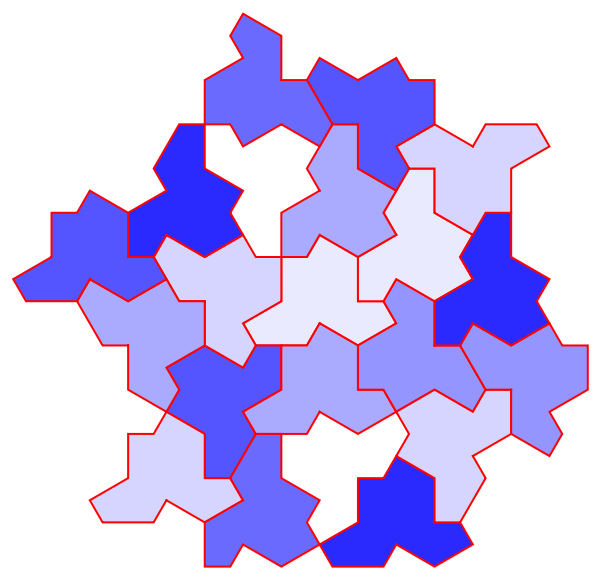 |
Use "Count" to generate more possible tilings:
| In[11]:= |
| Out[11]= | 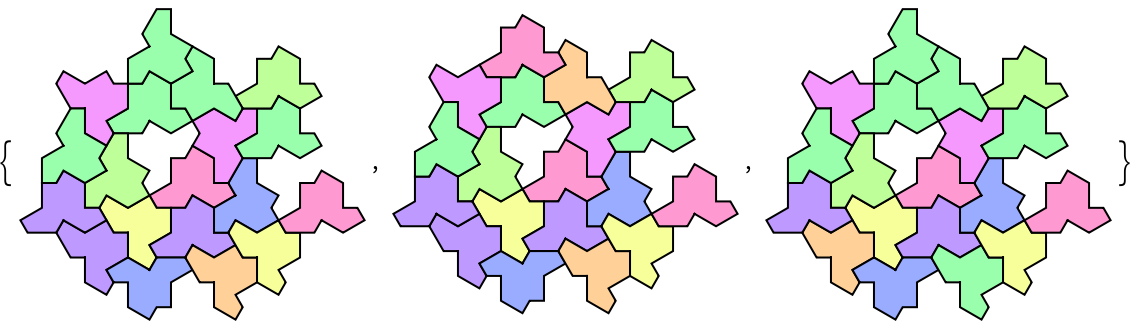 |
Generate all valid one layer surroundings:
| In[12]:= |
| Out[12]= | 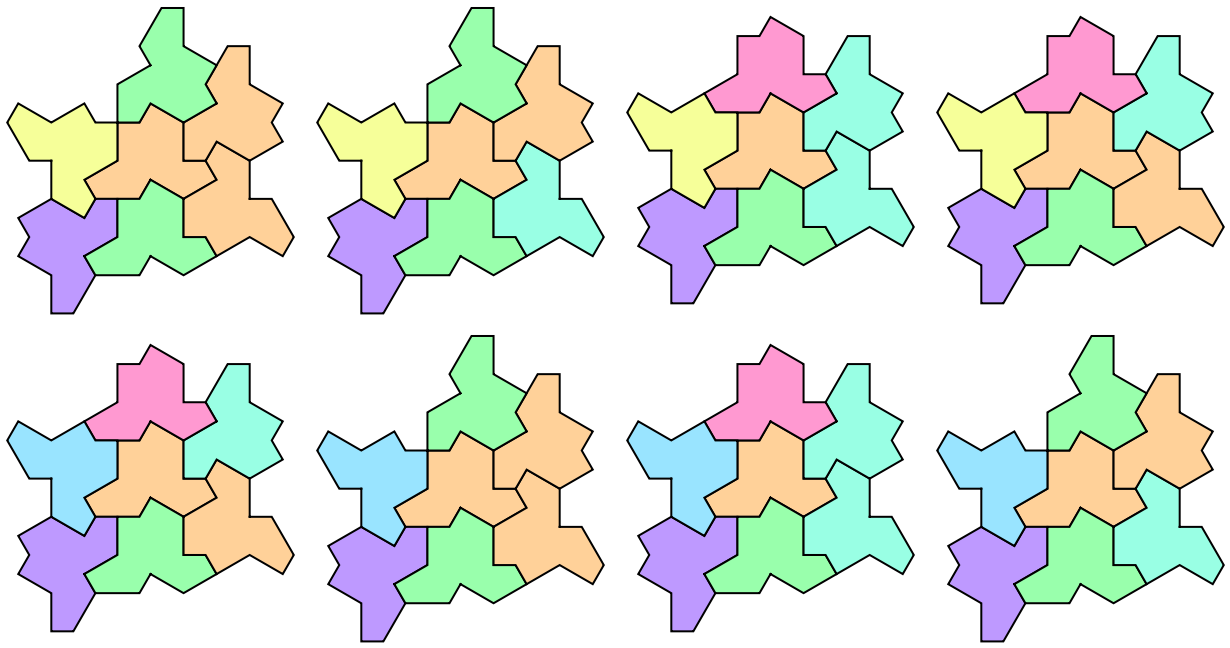 |
The resource function HatHexagons generates tilings by substitution rule, which gives a fractal structure. HatHexagonalTiling focuses on surrounding the center tile by multiple layers. Compare the results of two functions after using the same initial conditions:
| In[13]:= | ![Outer[
Labeled[
Row[{Show[ResourceFunction["HatHexagons"][#1, #2], ImageSize -> 100], ResourceFunction["HatHexagonalTiling"][#1, #2, "Hexagon", ImageSize -> 100]}]
, Style["init:" <> ToString[#1] <> " level:" <> ToString[#2], 12]] &
, Range[2], Range[0, 2]
] // Grid[#, Frame -> {False, All}, FrameStyle -> LightGray] &](https://www.wolframcloud.com/obj/resourcesystem/images/0b0/0b081130-492a-4834-bef8-2742fc4fba2f/6940952540f11d60.png) |
| Out[13]= | 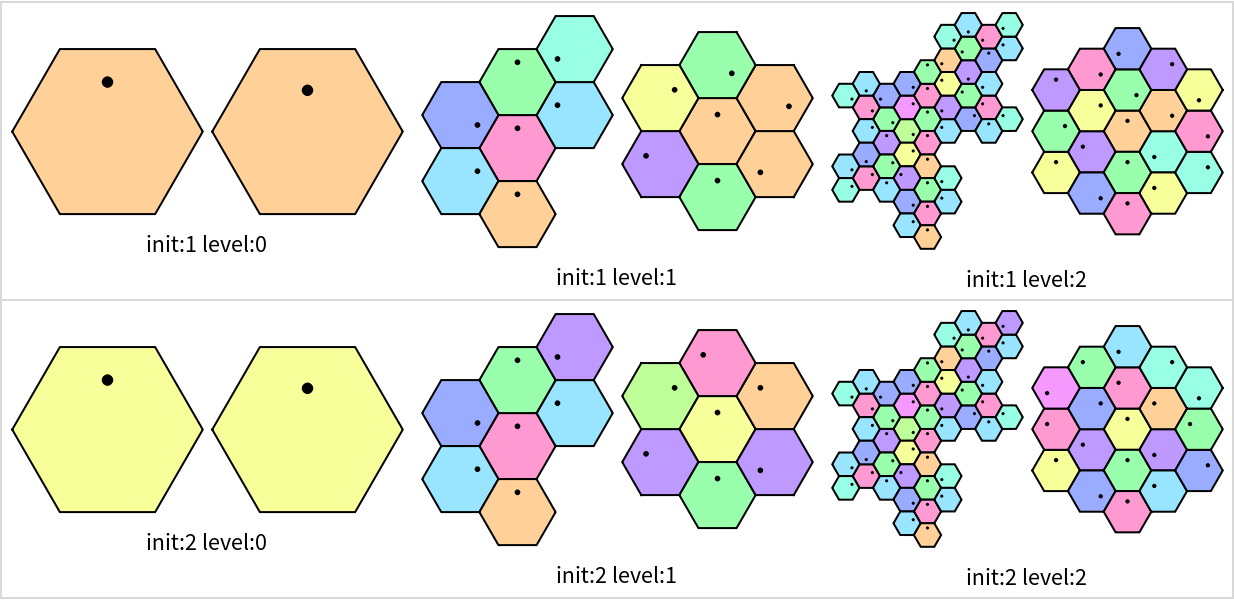 |
You can use this function to generate higher level supertiles of the Hat as a whole, and use HatHexagons to see how it is made of the hat tiles:
| In[14]:= | ![MapThread[
{ResourceFunction["HatHexagonalTiling"][6, 0, #1, ImageSize -> 150],
ResourceFunction["HatHexagons"][6, #2, "Hat", ImageSize -> 150]} &,
{{"1-Supertile", "2-Supertile", "3-Supertile"}, {1, 2, 3}}
] // Transpose // Grid[#, Dividers -> {All, True}, FrameStyle -> LightGray] &](https://www.wolframcloud.com/obj/resourcesystem/images/0b0/0b081130-492a-4834-bef8-2742fc4fba2f/02c1c06cf8b43d12.png) |
| Out[14]= | 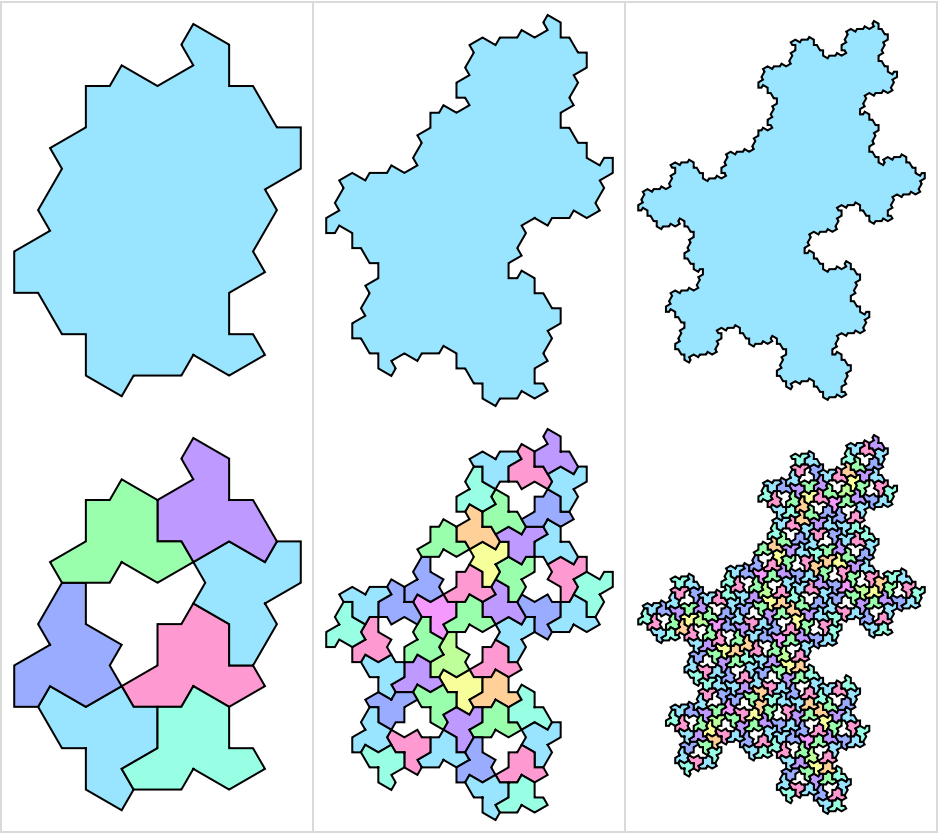 |
The "Cluster" is exactly 1-Supertile, the "SuperCluster" is exactly 2-Supertile and the "Hat" is the "0-Supertile":
| In[15]:= | ![Labeled[Row[ResourceFunction["HatHexagonalTiling"][9, 0, #]], #[[1]] <>
" " <> #[[2]]] & /@ {
{"Hat", "0-Supertile"},
{"Cluster", "1-Supertile"},
{"SuperCluster", "2-Supertile"}
} // Column[#, Frame -> All, FrameStyle -> Gray, Alignment -> Center] &](https://www.wolframcloud.com/obj/resourcesystem/images/0b0/0b081130-492a-4834-bef8-2742fc4fba2f/15462c4597ad162e.png) |
| Out[15]= | 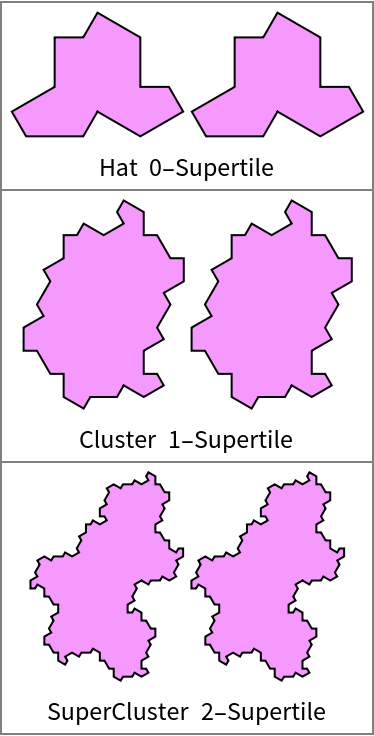 |
The holes in the Hat tiling are where the reflected tiles should be. An easy way to fill them is:
| In[16]:= | ![Replace[ResourceFunction["HatHexagonalTiling"][1, 6, "Hat", ImageSize -> 400]
, {a___, Lighter[Hue[10/11], .6], p_Polygon, b___} :> {
a, Lighter[Hue[10/11], 0.6], p,
Lighter[Hue[1], 0.4], Polygon[{{
Rational[-3, 2], Rational[1, 2] 3^Rational[1, 2]}, {
Rational[-3, 2], Rational[3, 2] 3^Rational[1, 2]}, {
Rational[-1, 2], Rational[3, 2] 3^Rational[1, 2]}, {
Rational[1, 2], Rational[5, 2] 3^Rational[1, 2]}, {0, 3 3^Rational[1, 2]}, {
Rational[-3, 2], Rational[5, 2] 3^Rational[1, 2]}, {-3, 3 3^Rational[1, 2]}, {
Rational[-7, 2], Rational[5, 2] 3^Rational[1, 2]}, {
Rational[-9, 2], Rational[5, 2] 3^Rational[1, 2]}, {
Rational[-9, 2], Rational[3, 2] 3^Rational[1, 2]}, {-3, 3^Rational[1, 2]}, {
Rational[-7, 2], Rational[1, 2] 3^Rational[1, 2]}, {-3, 0}} . Transpose[
RotationMatrix[(ArcTan @@ (p[[1, 2]] - p[[1, 1]])) + Pi/6]] + Threaded[p[[1, 1]]]], b}
, {2}]](https://www.wolframcloud.com/obj/resourcesystem/images/0b0/0b081130-492a-4834-bef8-2742fc4fba2f/3b2d23c4bdbf84d2.png) |
| Out[16]= | 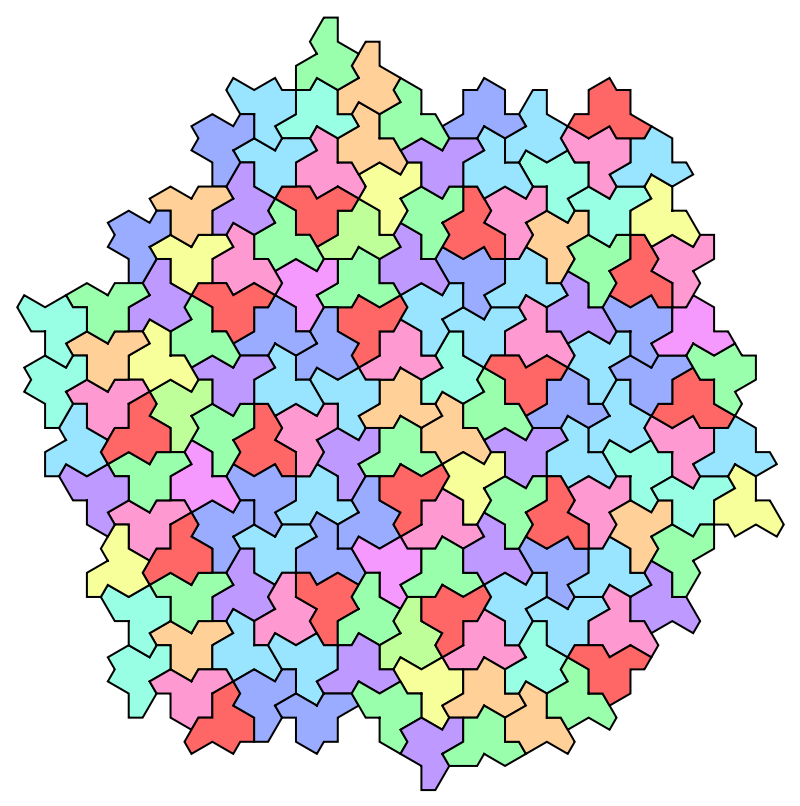 |
Duplicate elements in typelist will give duplicate corresponding results:
| In[17]:= |
| Out[17]= | 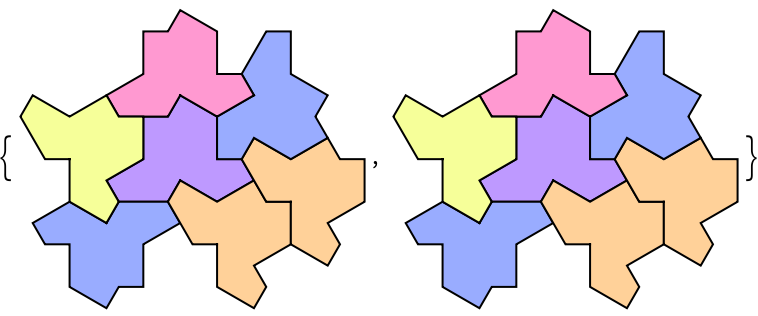 |
If you want to generate combinatorial tilings with different type of tiles, please use the typelist argument rather than Map. There is a significant efficiency difference:
| In[18]:= |
| Out[18]= |
| In[19]:= |
| Out[19]= |
They have the same result:
| In[20]:= |
| Out[20]= |
Show the two kinds of tiles next to the reflected tiles:
| In[21]:= |
| Out[21]= | 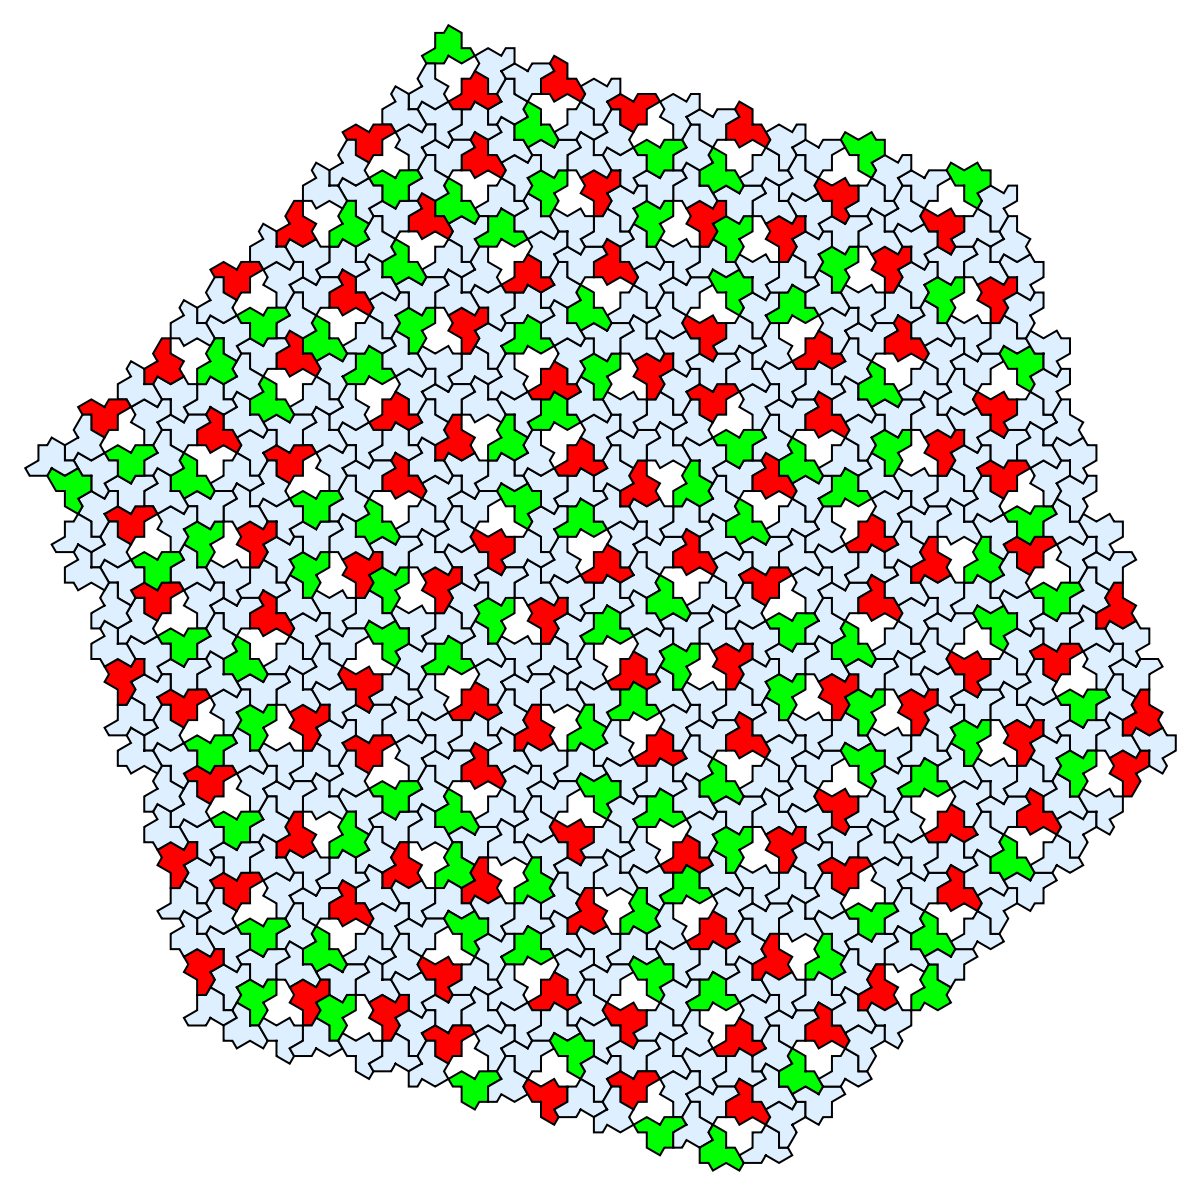 |
Wolfram Language 13.0 (December 2021) or above
This work is licensed under a Creative Commons Attribution 4.0 International License
